![]()
With the impending release of X-Wing 2.0, I’ve decided to get two of our guest posters, Nick and Charlie, to try their hands at X-Wing before we switch to the new system in 2.0. Both players are new to X-Wing and the rules, but Charlie has experience playing Warhammer (as detailed here).

Today, Nick will fly a 100 point Scum list against Charlie’s 100 points of Rebels. Charlie specifically provided a pre-game thought process:
“Inspired by the book “X-Wing: Rogue Squadron”, this list features the three characters from the book who are named characters in the game for Rebels. Corran Horn is really expensive E-Wing who I’ve never flown, or even looked at the dial for. Tycho is an ace A-wing pilot with a dial covered in green moves. Wedge I’ve used many times but he’s flying a slightly different kit than he normally does.”
“Tycho and Corran are PS8, and Wedge is PS9. That means I get a lot of flexibility with moving Corran and Tycho in front of Wedge in the order I pick, and Wedge can come up and allow one of them to perform an additional action. That means Tycho could potentially do 3 actions per turn, which may come in handy, and I’ve given him the Wired ability because he’s going to be stressed the entire game, which is the whole point of using him.”
“Corran’s ability is great for setting up a Joust and then reset over the next turn, which I’m familiar with from my T-65 list. Corran will almost always have a target lock because of FCS, which makes the droid potentially useful, especially during the recharge turn. Wedge in my other list is typically not a great shooter, Nick has two large ships, which are tough for this list to take down because they don’t do a lot of damage. That means I need to work on not being hit early in the game and try to stay out of arc as much as possible.”
“Luckily the A-wing and E-wing have great dials, and the T-65 with S-foils in Attack position can move a little bit better with Barrel Rolls than it otherwise does. My plan is to engage the YV-666 early on and try to get it to the point where only one ship needs to focus on it while the other two pull off to start on the Punishing One.”
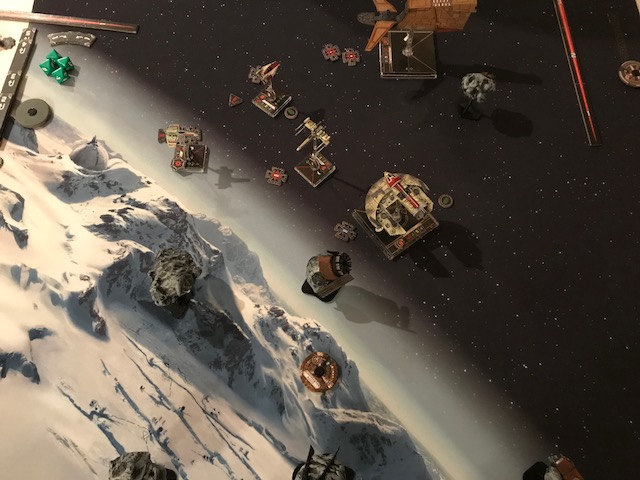
The battle was played on a standard 3×3 mat and I tried to get pictures after the movement for that round (which should also show what actions were taken). You may also notice the 3D asteroids created by Charlie himself, which add a nice little flair to the table (as well as an incentive to avoid flying through them).
Onto the battle!
Lists:
Charlie:
- Wedge Antilles (31) – X-Wing (T-65)
Squad Leader (1), •R5-K6 (2), Renegade Refit (-2), Servomotor S-foils (0)
- Corran Horn (40) – E-Wing
Calculation (1), R7 Astromech (2), Fire Control System (2)
- Tycho Celchu (30) – A-Wing
Push The Limit (3), Chardaan Refit (-2), A-Wing Test Pilot (0), Vectored Thrusters (2), Wired (1)
Nick:
- Moralo Eval (52) – YV-666
Heavy Laser Cannon (7), •”Gonk” (2), Tactician (2), Recon Specialist (3), Engine Upgrade (4)
- Dengar (48) – JumpMaster 5000
K4 Security Droid (3), •Punishing One (12)
Turn 1:

Both sides advance straight ahead, preparing for a joust. The rebel ships were tightly packed around a single asteroid, while Dengar took a longer flanking path through the thickest of the asteroid clusters. Various targets locks were exchanged between the YV-666 and the boosted A-Wing.
Dengar got a Range 3 potshot off on Tycho but failed to do damage. In response, Tycho fired a potshot at the YV-666, picking off a single shield. Not bad from range 3 with two red dice.
Turn 2:

In the second round of movement, the slow and steady YV-666 continued to inch forward toward all three Rebel ships, while Dengar slowly swooped up behind the main battle line. All three Rebel ships advanced with guns fixed forward on Moralo in the YV-666.
Wedge opened up the shooting by firing at the YV-666 and dealing three shield damage (and with only one agility, Moralo is defenseless against Wedge’s pilot ability reducing agility by one). Dengar responds by shooting Wedge and taking Wedge’s shields with three red dice. Tycho fires across the rearside of Moralo taking another shield. Corran finishes the salvo by double tapping (firing in shooting phase plus utilizing his pilot ability to fire a second time) putting two more damage into the YV-666.
The large Scum ship has taken heavy damage from the Rogue Squadron, but fires its Heavy Laser Cannon at Wedge, dealing two hits, but the fearless leader dodges both with two natural evade rolls.
Turn 3:
Moralo veers the YV-666 slightly left then boosts to straighten alignment ahead, just short of the small asteroid. Dengar takes a 2-hard turn around the asteroid cluster to put all of Rogue Squadron in his primary arc (where he gets a free attack with his pilot ability).
Wedge gently turns towards the asteroids, which puts him at a dangerous range of the Punishing One. Tycho maneuvers his A-Wing to trail behind the YV-666, setting up a good shot and staying out of arc. Finally, Corran, who cannot fire this turn, K-turns to prepare to re-enter the fight the next turn.
Dengar starts the shooting by absolutely decimating Wedge with a Range 1 shot with target lock and focus. Wedge explodes in a flash of brilliant light.
Seeking to avenge the downing of his dear leader, Tycho fires his primary weapon into the rear of Moralo, landing a critical hit to go along with a regular hit, the result of which leaves the laser-riddled YV-666 with one hull point remaining.
Turn 4:

With only one hull and weak dial, Moralo attempts to 3-hard around the asteroid, but the back of the ship overlaps the asteroid base, taking away the action and ability to shoot. However, the YV-666 avoided taking its final damage from the overlap, rolling a blank.
Tycho pulls his A-Wing right behind the YV-666, preparing a range 1 shot. Corran, ready to fire this round, moves up one forward and takes a focus. Dengar moves straight at Corran but then deftly barrel rolls to the left to keep the E-Wing in arc and get to range 1.
Dengar faces down Corran and prepares for a back and forth salvo. Dengar starts with landing four hits at range 1, with Corran evading two of the results keeping one shield. Corran responds by shooting back at Dengar, landing two shield damage. Dengar’s pilot ability activates, once again opening a salvo back at Corran shredding Corran’s last shield (now down to two hull). At the end of the turn Corran once again fires at range 1 into the Punishing One taking the remaining shields. After the full-on fusillade between the two, both ships are down to hull.
Meanwhile, the wild A-wing spins and boosts and fires into the flaming YV-666, blowing it to smithereens. It’s now two on one.
Turn 5:

Without the YV-666 to pick on, Tycho flys back towards the middle of board to begin pinging Dengar. Corran 2-banks directly toward Tycho and focuses. Dengar blazes forward with a K-turn to face both of the remaining Rogue Squadron members with his front arc.
With an easy shot, Dengar fires into the rear of Corran but completely whiffs without a focus to flip multiple dice. Tycho fires a range 3 salvo, resulting in a critical hit that turns into two hull damage on the Jumpmaster. Dengar’s pilot ability gives him a shot at Tycho, ripping the first shield token off the A-Wing.
Turn 6:

Corran K-turns to face Dengar, while Tycho banks slightly toward the large ship, following it up with a barrel roll and target lock to get maximum damage. Dengar 2-banks towards both ships, giving a free target lock off K4, and also taking a focus.
With so little hull and shield remaining across both squads, Dengar chooses to fire on the E-Wing to prevent a double shot on this critical turn. Dengar rolls two hits and one critical, to which Corran activates his astromech to force a reroll on all three dice. With only two hull remaining, Corran needs Dengar to roll one less damage. Instead, the pilot of the Punishing One naturally rerolls the exact same critical and two damage on three dice. Corran fails to evade any of the results and explodes under the withering primary turret fire.
Tycho, preoccupied with seeing another of his squadmates go up in flames, is just out of arc of the Scum ship, and it’s back to dials.
Turn 7:

It’s down to the A-wing versus the Jumpmaster, with 3 damage left for Tycho, and two left for Dengar. Tycho begins by 2-banking directly into Dengar’s rear, critically losing his ability to Push the Limit to take two actions. Dengar then 2 Sengor’s Loops to the right with a perfect in-arc shot on Tycho.
Dengar fires at the A-Wing without any modification and pushes through one damage past the three agility dice. It’s now down to two hull versus two hull.
Turn 8:

Tycho banks to get Dengar in arc, and Dengar unsuccessfully sloops into the A-Wing leaving both ships bumped and thus no actions and no shooting. The battle continues.
Turn 9:

Tycho switches on the afterburners and moves 5 straight and follows it up with a boost forward. Dengar sloops back the other direction and is out of range after the A-Wing blasted off towards the asteroids.
Turn 10:

Tycho take a big turn through the asteroids trying to line up a shot during the re-approach. Dengar takes a one forward, shedding the stress from the sloop, and getting both a target lock and a focus.
Dengar, PS 9, gets the first shot at Tycho. The shot is Range 3 and through an obstruction, giving the wily A-Wing pilot 5 agility dice. Nevermind the odds, Dengar rolls three hits through modification. Tycho responds with ONE EVADE on five dice, taking a the last damage for the Rebels, spiraling out of control into the nearby asteroid.
Result: Scum wins 100-48!
Post-Game Thoughts:
As an observer to the battle, it was definitely a close one. It was interesting to see two newer players square off with different styled squads, with the heavy hit points on the Scum side versus the more agile and maneuverable Rebel squad. Both players were still learning a lot of the rules but generally flew pretty well in keeping in arc and maximizing their chances at getting damage output.
Nick mentioned in the post-game that the YV-666 was difficult to maneuver with its limited dial which lacks a K-turn, so must turn around through a series of hard turns. Furthermore, he felt he needed to simply learn more about his squad list and its capabilities. He was very impressed with the Jumpmaster piloted by Dengar, really liking the turret primary weapon and it’s very open dial.
Charlie provided the following post-game commentary:
“I didn’t realize Tycho could make a fake K-turn with such ease. The A-wing has a green 2-turn, and then with a boost and maybe a roll, he can be back in position to shoot in one turn without revealing a red maneuver (which he will never be able to do).”
“I wish I had been giving Corran focus tokens, since his Calculation ability could deal damage a little better, even though I will probably change out that ability for something a little different in subsequent builds. Similarly I will probably change out Wedge’s droid, since I don’t think I ever used it successfully.”
“During the game I feel I mostly made good moves, aside from flying into an asteroid early and losing a shield. At a key point in the game I had Nick where I wanted him and had a clear advantage, and dice rolls didn’t go in my favor. Given that the list doesn’t have much attack power, and I had the Punishing One at 2 Hull Points after a bad bump in the end-game, I’m pleased with the game.”
“As I mentioned I will probably change out some parts of this list for future flights. I really enjoyed the fluff of the 3 characters and there was some natural synergy between the pilots and ships.”
“Wedge had trouble getting involved and I need to make some adjustments for that. Corran might do well with something that allows him to recover shields, but R2-D2 wasn’t part of Rogue Squadron once Luke Skywalker left after the Galactic Civil War to restart the Jedi Academy, and you can’t mess with that kind of stuff in this game, it’s bad Karma. Tycho seems to have a good outfit, and I think he was a great value for the relatively low number of points spent.”
“My flying in this game could have been better, and I’m not that new to the game anymore so there are no excuses. I should have taken advantage of my small ships and high maneuverability and flown into the asteroid field on the left side of the board and made Nick deal with that, since both of his large base ships would have had major problems I suspect. In the end it was one of the most fun games I’ve played in X-Wing and the time flew by. I can’t wait to fly this list again!”


Pingback: Battle Report: X-Wing 2.0 200 pt Imperial v Rebel | Particlebit
Not much to add here, I just wanted to say I really enjoyed this play-by-play. Fun way to get a look at the game.
LikeLiked by 1 person
Really enjoyable report especially as I’ve not yet played x-wing (or armada) but have it in my sights with the new edition.
LikeLiked by 1 person
It’s a really easy game to get into. Rules are fairly easy, models are relatively lower priced than other miniature games, theme is great. I highly suggest it!
LikeLiked by 1 person